
In today’s world, we often rely on smartphones or TV channels to get weather updates. However, have you ever thought about creating your own weather forecast instruments? Not only is it a fun and educational activity, but it also brings you closer to understanding how nature works. Additionally, you may rethink the way weather apps like Rain Viewer work by having all of these tools available in your smartphone, just a tap away.
DIY weather instruments are simple, cost-effective, and can be made of everyday materials. In this post, we’ll explore various weather tools, explain how to build them, and how they can help you predict the weather right from your backyard.
The Importance of Understanding Weather
Understanding weather patterns is crucial, especially if you enjoy outdoor activities, gardening, or just want to be more self-reliant. Basic weather instruments help track variables like temperature, wind speed, rainfall, and barometric pressure. While professional meteorologists use advanced equipment, you can still gather valuable weather data with homemade weather instruments. Plus, it’s a fun project that kids and adults alike can enjoy, enhancing your understanding of meteorology.
1. Rain Gauge: Measuring Precipitation

A rain gauge helps measure the amount of precipitation in a given area. This weather tool is essential for tracking rain or snow, especially for gardeners and farmers. The good news is that you can easily make one by using a few simple materials:
- A plastic bottle (2-liter bottle works well)
- A ruler or measuring tape
- Scissors or a knife
- Tape
- A few stones or pebbles
How to Make a Rain Gauge:
- Use scissors to cut the top off the bottle about a third of the way down.
- Invert the top and place it inside the bottom part, creating a funnel.
- Tape the two parts together securely.
- Add some stones to the bottom to weigh it down.
- Place a ruler or measuring tape on the side of the bottle to record rainfall levels.
Place the rain gauge outside in an open area away from buildings, trees or other obstructions. Each time it rains, check how much water has accumulated by looking at the ruler. Empty the bottle after each measurement to ensure accuracy.
2. Barometer: Tracking Air Pressure
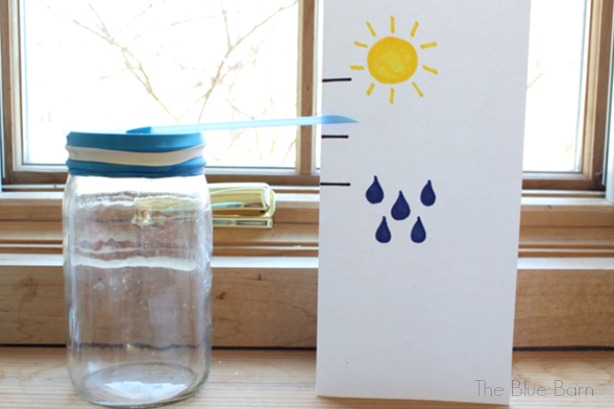
A barometer measures atmospheric pressure, a key indicator of weather changes. High pressure generally indicates clear weather, while falling pressure often signals stormy conditions. You’ll need the following materials:
- A glass jar
- A balloon
- A rubber band
- A straw
- Tape
- A piece of paper or cardboard
Making a Barometer
- Cut the balloon in half and stretch the top half over the mouth of the jar. Secure it with a rubber band.
- Tape a straw horizontally across the top of the balloon, with one end sticking out beyond the jar.
- Place a piece of paper or cardboard behind the straw and draw a scale to track the straw’s movements.
- As the air pressure changes, the balloon will expand or contract, causing the straw to move. Rising pressure will make the straw go up, while falling pressure will cause it to move downward.
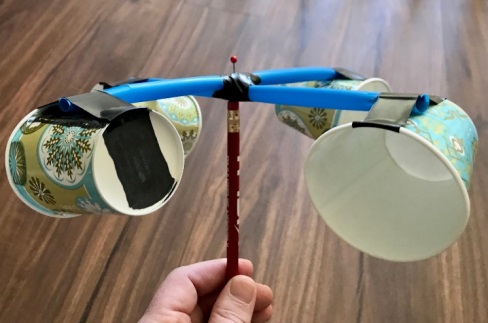
3. Anemometer: Measuring Wind Speed
 Source: NASA
An anemometer helps measure the speed of wind, which is crucial for understanding weather patterns, especially when tracking storms. Meteorologists widely use this tool, but you can build a simple version at home with the following materials:
- 4 plastic cups
- 2 straws
- A pencil with an eraser
- A pushpin
- Tape
- A small piece of cardboard
How to Make an Anemometer:
- Cross the two straws and tape them together in the middle, forming an “X” shape.
- Tape a plastic cup to the end of each straw.
- Push the pencil’s eraser through the center of the straws, allowing the straws to spin freely.
- Secure the straws by pushing the pushpin through the straws into the pencil’s eraser.
Place your anemometer outside in an open space. The faster the cups spin, the stronger the speed. You can count the number of rotations in a set amount of time to estimate speed.
4. Weather Vane: Determining Wind Direction
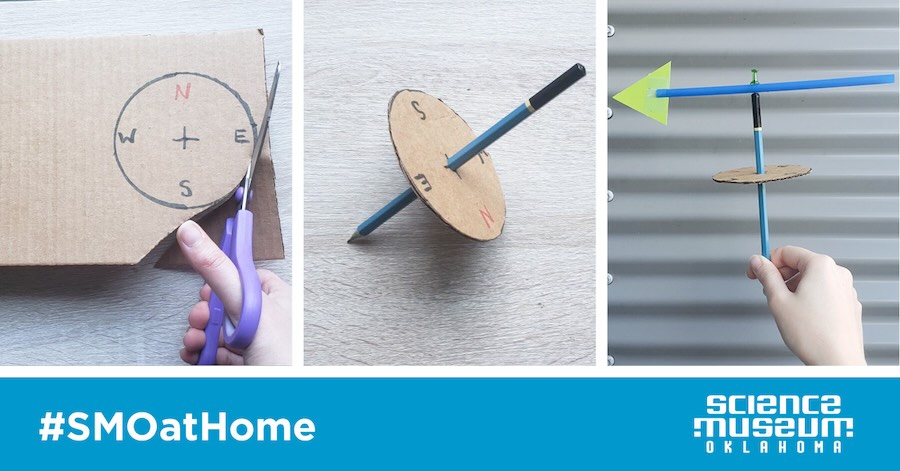
A wind vane, or weather vane, is a classic tool used to show the direction the wind is blowing. You can easily make one at home with minimal materials:
- A bottle made of plastic
- A straw
- Cardboard
- A paper plate
- A pencil with an eraser
- A pushpin
- Scissors
How to Build a Wind Vane:
- Cut an arrowhead and tail shape out of cardboard.
- Attach the arrowhead to one end of the straw and the tail to the other with the tape.
- Push a pin through the middle of the straw into the pencil’s eraser, making sure the straw can rotate freely.
- Place the pencil into the top of the bottle filled with sand or small stones to keep it stable.
- Draw the directions (N, W, E, S) on the paper plate and put the vane onto the plate.
- Place the wind vane outside in a location where it can catch the wind. The arrow will point in the direction the wind is blowing.
5. Hygrometer: Measuring Humidity
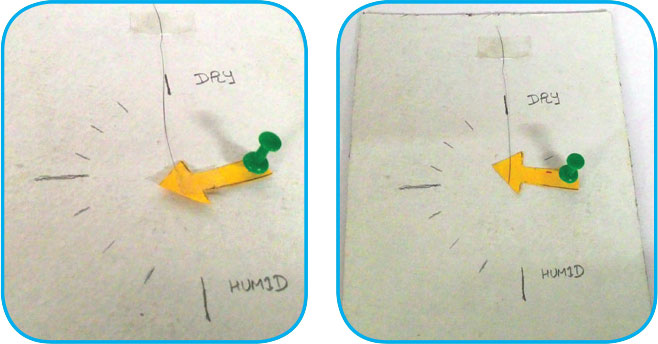 Source: Champak
A hygrometer is used to measure the amount of moisture in the air. Here’s what you need to build this instrument:
- A strand of human or animal hair (yes, hair! It contracts and expands with humidity changes)
- A small wooden frame (such as a picture frame)
- A nail or thumbtack
- A small weight (like a washer)
- Tape or glue
How to Make a Hygrometer:
- Attach the hair strand between two nails or tacks on the wooden frame.
- Attach the weight to one end of the hair strand to keep it taut.
- Create a simple scale on the frame to track changes in the hair’s length. As the amount of moisture in the air increases, the hair will lengthen, and as it decreases, the hair will shorten.
Homemade Weather Instruments: Summary
Here’s a handy table summarizing the instruments we’ve covered:
| Instrument | Function | Materials Needed |
|---|---|---|
| Rain Gauge | Measures rainfall | Plastic bottle, ruler, tape, scissors, pebbles |
| Barometer | Measures air pressure | Glass jar, balloon, straw, rubber band, tape, paper |
| Anemometer | Measures wind speed | 4 plastic cups, straws, pencil, pushpin, tape |
| Wind Vane | Measures wind direction | Bottle (plastic), straw, cardboard, pencil, pushpin, scissors |
| Hygrometer | Measures humidity | Hair strand, wooden frame, nails, weight |
Creating your own weather instruments is a rewarding and educational project that offers insight into how weather works. You can not only make predictions of local weather and track its patterns. You’ll also develop a deeper appreciation for the natural forces at play and weather apps conveniently delivering all of these tools to your smartphone.
Whether you’re a hobbyist, a student, or someone who loves science, making these tools can help you better understand the atmosphere and even forecast the weather right from your home. So, gather your materials and start building. Good luck!